Create Database
In SQL Server instance you can create your own user databases that will hold application data, each instance can contain one or many databases.
Within a database, there are one or many object ownership groups called schemas. Within each schema there are database objects such as tables, views, and stored procedures.
You can create a database using SSMS or T-SQL, both methods have their own advantages and disadvantages. T-SQL is more flexible, but it does not offer the simplicity of the graphical interface. T-SQL method allows reuse of your code in different cases. But if the syntax for the commands is not yet familiar to you, you can choose to use a SSMS.
To create a database using SQL Server Management Studio:
In Object Explorer, connect to an instance of the SQL Server Database Engine and then expand that instance. Right-click Databases, and then click New Database. In New Database, enter a database name.
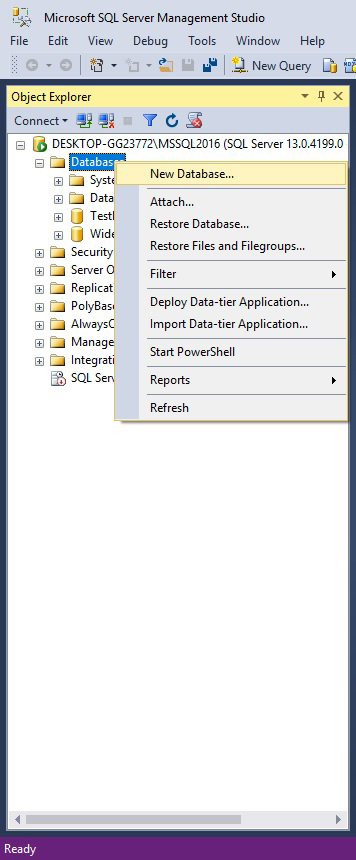
Enter the database name. To create the database by accepting all default values, click OK; otherwise, continue with the optional steps.
In case of using T-SQL you must use the CREATE DATABASE statement. The statement has a required parameter - the databases name. CREATE DATABASE also has many optional parameters, such as the logical file name, the size of the file, the disk location where you want to put the database files and other parameters. When you execute CREATE DATABASE without the optional parameters, SQL Server uses default values for many of these parameters.
The simplest example:
CREATE DATABASE TestDB;
If you no longer needed the database you can delete it:
DROP DATABASE TestDB;
SSMS allows to generate the creation script for existing database:
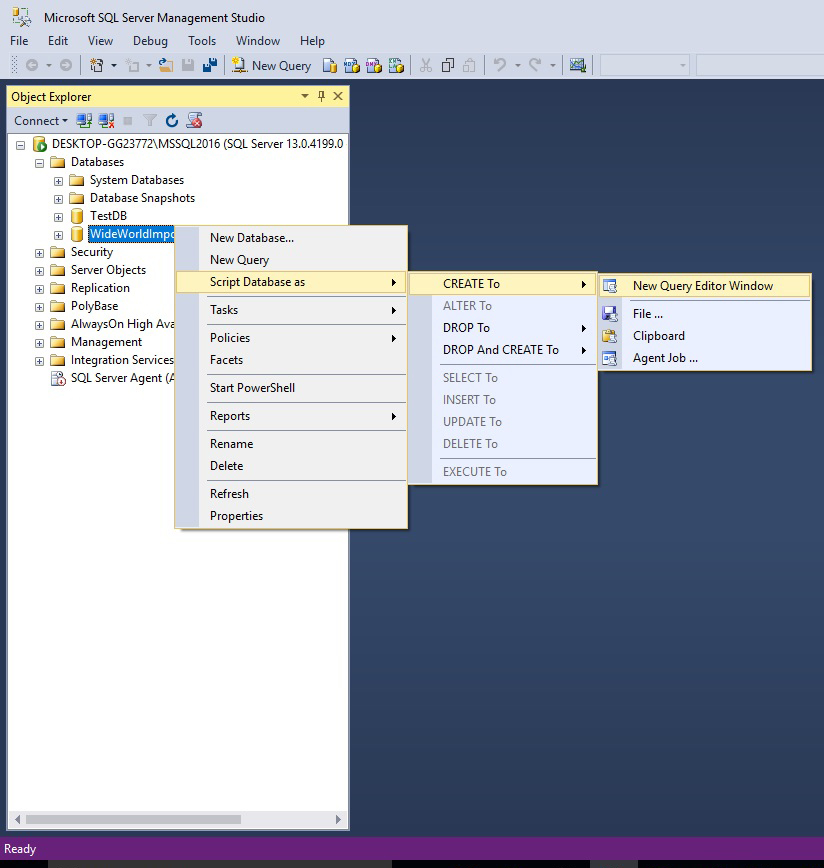
Right click on the database and select Script Database as->Create To->New Query Editor Window. Now you can see how the database was created with T-sql code. You can also generate the creation script for others databases objects
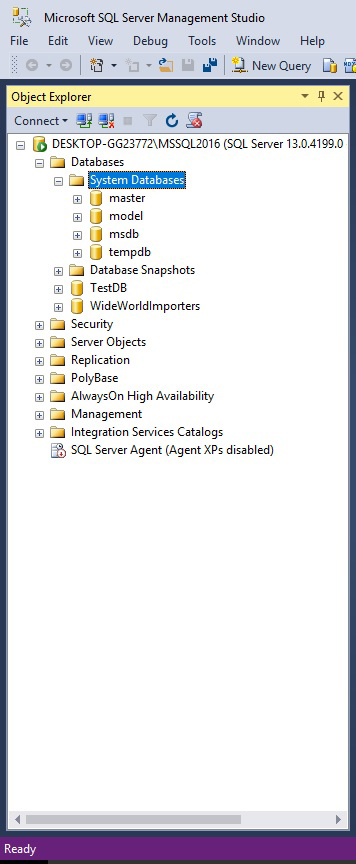
Also SQL Server has five system databases: master database, msdb database, model database, resource database (it’s a read-only database), tempdb database:
Basic Commands Exercises
However, sometimes, most often in programs, it is impossible to use graphic user interface and code must be written.
The following table shows some types of information that can be stored in a database and data type used to store it. There are many more types than just these stated here.
| Data we want to store | Type of data that can be used |
|---|---|
| Number | int, bigint, float, decimal |
| Text | char, varchar, nvarchar |
| Date | date, datetime, datetimeoffset |
| Picture | Image |
| Currency | Money |
Every column in a table must have two parts: (1) column name (2) data type stored in a column. Every table can have multiple columns. When we define data type we often use constraints. This is represented as a number in brackets. It means how many digits/letters data can have. For example, char (10) means that we want to store text that has a maximum of 10 letters. It is also a good practice to indicate whether the NULL or NOT NULL values for each column after the column’s data type. NULL means the column allows NULLs, and NOT NULL means it does not allow NULLs.
If you use characters and reserved words in the columns or tables names the delimited identifiers are required. Also the delimiters needed if the names include the embedded spaces.
T-SQL supports two kinds of delimited identifiers: square brackets (e.g. [Last Name]), it is proprietary in T-SQL and double quotes (e.g. "Last Name"), it is standard of SQL. If you generate scripts with SSMS all the names will be in square brackets.
In other cases you do not need to use them every time you referred to the objects names. It will be better to focus more on better naming convention that would avoid the using of delimiters.
Most tables have a primary key, made up of one or more columns of the table. A primary key is always unique. The Database Engine will enforce the restriction that any primary key value cannot be repeated in the table.
CREATING TABLES
The first step in developing a database is creating tables. This can be done using graphic user interface. However, for this tutorial we will use code.
The statement used for creating tables is CREATE TABLE. The statement is used as follows:
CREATE TABLE “tableName”
(“columnName” “datatype”(constraint))
Multiple columns can be added at once.
Let's create a table we will use in this tutorial. We will use a table that contains information about students in a school. We want to have: name, surname, age, city, main subject. The constraint is the limit of character a word or number can have.
We will start by adding one column.
In SSMS Object Explorer, connect to an instance of Database Engine.
On the Standard bar, click New Query.
Write the t-sql code in the query window and click Execute.
USE “database name”
GO
It is important to include the USE statement in scripts that create database objects to ensure that SQL Server creates the objects in the specified database. So, set the current database context and add the next code:
CREATE TABLE Student
(Name char)
We will get table like this:

You can see the created table in Object Explorer, expand the Tables and refresh the list:

By default, the database owner “dbo” schema is automatically created in a SQL Server database. Unless you specify otherwise, all SQL Server user objects are created in the database owner “dbo” schema.
EXERCISE:
- Add all other columns into table.
- Set name column to have a maximum of 10 characters, and surname to have a maximum of 20 characters.
- Set main subject to have less than 15 characters and city to have a maximum of 20 characters.
CREATE TABLE Student
(Name char(10),
Surname char(20),
Age int,
City char(20),
Main_subject char(14))
INSERTING DATA INTO TABLE
After creating table next step is to insert data into it. Inserting data makes it easier for us later to find what we need. The statement used for inserting data is INSERT INTO. The statement is used as follows:
INSERT INTO “tableName” (“columnName“)
VALUES (“value”)
In T-SQL INTO is an optional keyword that can be used between INSERT and the target table, but it will be a good practice to include it to ensure that your code is portable.
Multiple information can be added into multiple columns.
Let's add name “Ann” into table
INSERT INTO Student (Name)
VALUES ('Ann')
We will get table like this:

NULL in a table means that there is no data in that field.
Let's add the following student into table: John Smith from New York, age 23
INSERT INTO Student (Name, Surname, City, Age)
VALUES ('John', 'Smith', 'New York', 23)
We will get table like this:

EXERCISE:
Insert the following information into table:
- John McKey from Chicago, age 19 has main subject Physics
- Ann Mary Sue from Los Angeles, age 21 has main subject Math
- 24 year old Susie Black from New Jersey has main subject Philosophy
- William Creek, 18, Washington, Music
- Angelina Knight, 21, Detroit, Physics
INSERT INTO Student (Name, Surname, City, Age,Main_subject)
VALUES ('John', 'McKey', 'Chicago', 23,'Physics')
INSERT INTO Student (Name, Surname, City, Age,Main_subject)
VALUES ('Ann Mary', 'Sue', 'Los Angeles', 21,'Math')
INSERT INTO Student (Name, Surname, City, Age,Main_subject)
VALUES ('Susie', 'Black', 'New Jersey', 24,'Philosophy')
INSERT INTO Student (Name, Surname, City, Age,Main_subject)
VALUES ('William', 'Creek', 'Washington', 18,'Music')
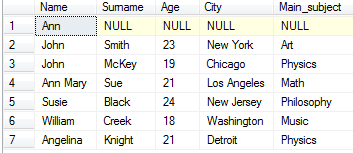
INSERT INTO Student (Name, Surname, City, Age,Main_subject)
VALUES ('Angelina', 'Knight', 'Detroit', 21,'Physics')
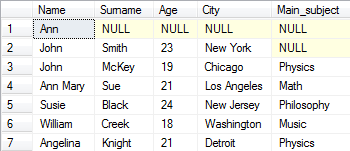
The INSERT VALUES statement does not limit you to inserting only one row, you can insert multiple rows in one statement. You can rewrite the previous statements in one:
INSERT INTO Student (Name, Surname, City, Age, Main_subject)
VALUES
	('John', 'McKey', 'Chicago', 19,'Physics'),
	('Ann Mary', 'Sue', 'Los Angeles', 21,'Math'),
	('Susie', 'Black', 'New Jersey', 24,'Philosophy'),
	('William', 'Creek', 'Washington', 18,'Music'),
	('Angelina', 'Knight', 'Detroit', 21,'Physics')
In case of insertion multiple rows in one statement it will be considered as one transaction. So, if only one row fails to insert into the target table (e.g. an error with inserting a duplicate value in key field), the entire statement will fail and no row will be inserted.
READING DATA FROM TABLE
When we are finished with inserting data into a table we often want to read some data from it. The statement used for reading data from table is SELECT FROM. The statement is used as follows:
SELECT “columnName”
FROM “tableName“
WHERE (condition)
WHERE part of statement is used to select only data that meet some condition. It is not needed to use WHERE part if we want to choose entire column.
Conditional selections used in WHERE clause when we work with numbers are:
- < less than
- > greater than
- = equal
- <= less than or equal
- >= greater than or equal
- <> not equal
When we work with text we use LIKE clause. If we want to get all data from a table, we can use character *.
SELECT *
FROM Student
T-SQL supports using an asterisk (*) as an alternative to listing all attributes from the input tables, but this is considered a bad practice for many reasons, a best practice is always to explicit the list the attributes that you need.
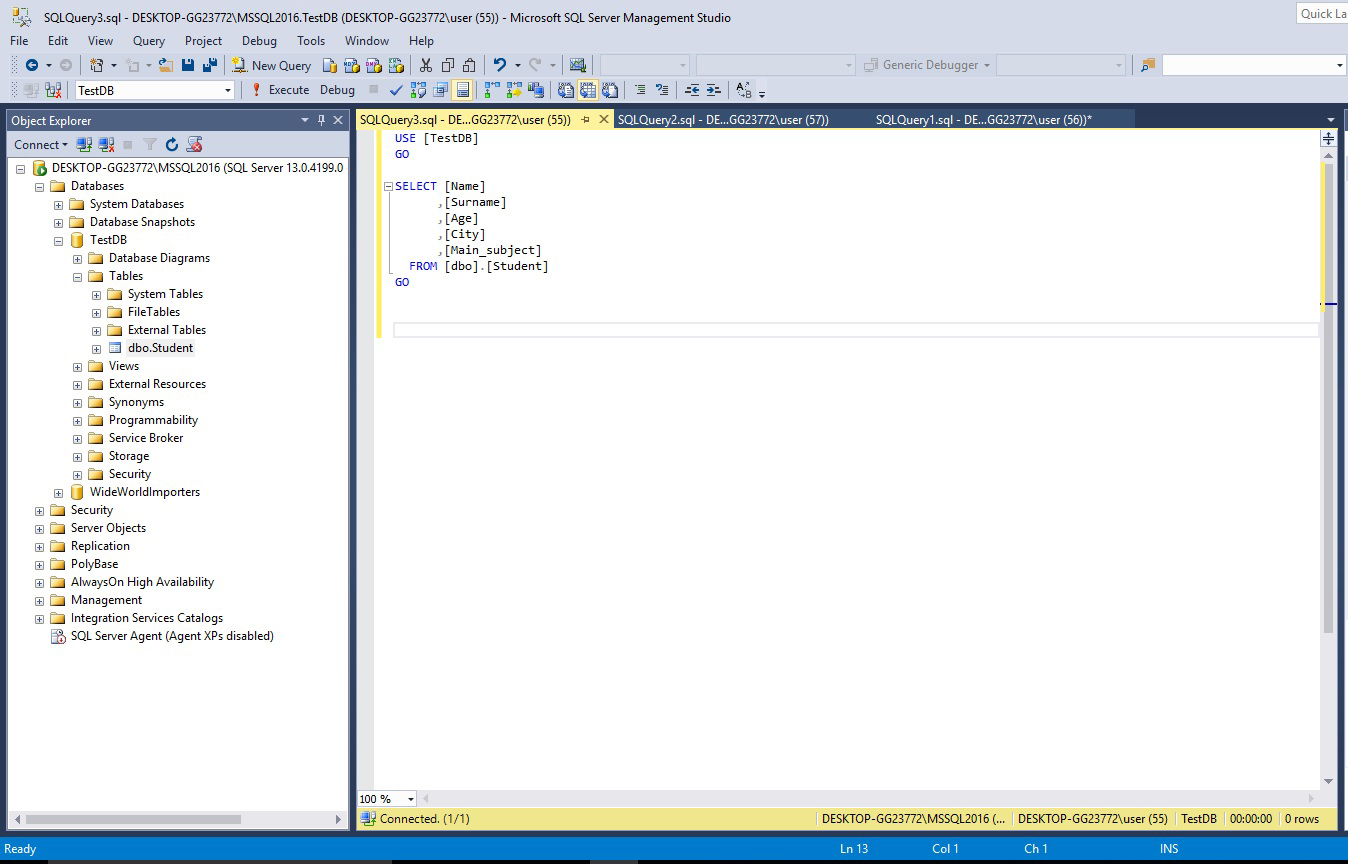
You can also create a template by SMSS:
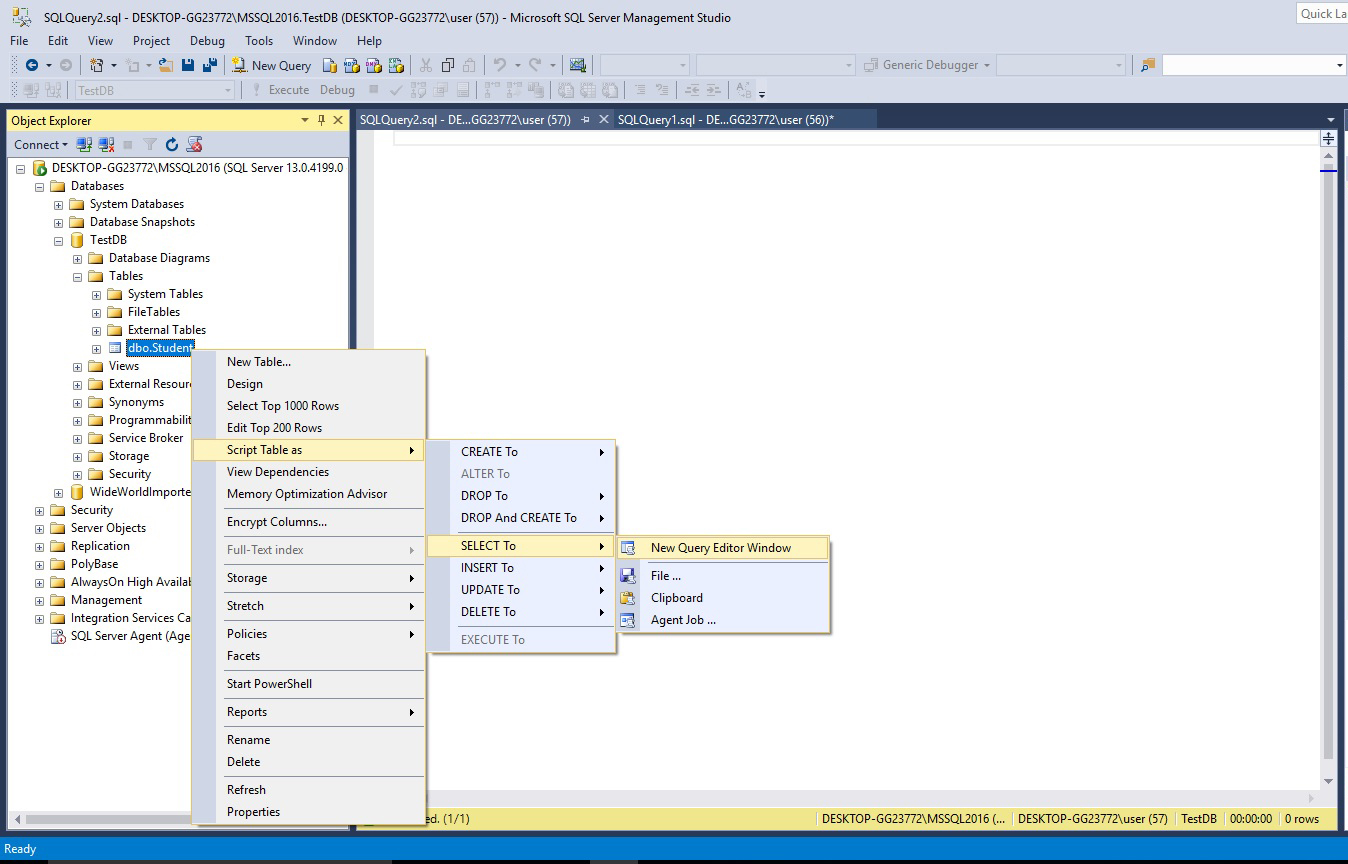
Right click on table, select Script Table as->SELECT To->New Query Editor Window. You will have:
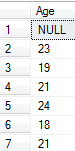
Let's select only age of all students
SELECT Age
FROM Student
Let's select only names of students who are 19 years old.
SELECT Name
FROM Student
WHERE Age = 19

Let's find all students from Chicago.
SELECT *
FROM Student
WHERE City LIKE 'Chicago'

If we want to get data that begins with specific letter we use character %. If we want all students from city beginning with letter B in LIKE part of a statement we would insert 'B%'.
EXERCISE:
- Select name and surname of all students.
- Select all students from Chicago.
- Select all students younger than 20 years.
- Select city of all students with name John.
- Select surname of students whose name begins with letter A.
- Select all students whose main subject begins with PH.
- Select age of all students where city name begins with “New“
- Select everything but age from students where main subject is Physics.
SELECT Name, Surname
FROM Student
SELECT *
FROM Student
WHERE City LIKE 'Chicago'
SELECT *
FROM Student
WHERE Age < 20
SELECT City
FROM Student
WHERE Name LIKE 'John'
SELECT Surname
FROM Student
WHERE Name LIKE 'A%'
SELECT *
FROM Student
WHERE Main_subject LIKE 'Ph%'
SELECT Age
FROM Student
WHERE City LIKE 'New%'
SELECT Name, Surname, City
FROM Student
WHERE Main_subject LIKE 'Physics'
UPDATING TABLE
Sometimes after inserting data into a table we realize that we made a mistake. We do not want to delete everything what we entered, but we just want to change one field. We do this by using an UPDATE statement. The statement looks like:
UPDATE “tableName“
SET “columnName” = “newValues”
WHERE “columnName”
OPERATOR “value”
Operators used in WHERE is part of an UPDATE statement are the same that we used in WHERE part of the SELECT statement.
Let's add Art as main subject for John Smith.
UPDATE Student
SET Main_subject = 'Art'
WHERE Surname = 'Smith'
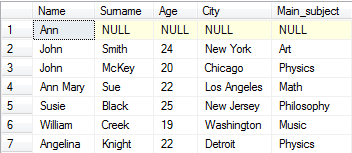
We can update same column for several rows or several columns at once. Let's increase age of everyone for 1 year.
UPDATE Student
SET Age = Age + 1
EXERCISE:
- Susie married William and changed her surname into the Creek. Write this in table.
- Everyone that has surname Creek lives in Washington. Write this in table.
- Everyone who is older than 23 years changed their main subject to Chemistry. Write this in table.
UPDATE TABLE Student

SET Surname = 'Creek'
WHERE Name LIKE 'Susie'
UPDATE TABLE Student

SET City = 'Washington'
WHERE Surname LIKE 'Creek'
1)	UPDATE Student
SET Surname = 'Creek'
WHERE Name LIKE 'Susie'

2)	UPDATE Student
SET City = 'Washington'
WHERE Surname LIKE 'Creek'

3)	UPDATE Student
SET Main_subject = 'Chemistry'
WHERE Age > 23
DELETING FROM TABLES
Sometimes we do not need some information stored in our database, and we want to delete it. In our case it would be when a student graduates. We can delete data using the DELETE statement. It looks like:
DELETE FROM “tableName“
WHERE “columnName“
OPERATOR “value“
Operators used in WHERE part of the DELETE statement are the same that we used in WHERE part of SELECT statement.
Looking at our table, we see that for Ann we only have name and none of the other data. Let's delete that row.
DELETE FROM Student
WHERE Name LIKE 'Ann'

Let's remove all data about persons that have name John or surname Creek.
DELETE FROM Student
WHERE Name LIKE 'John'
OR
Surname LIKE 'Creek'

IMPORTANT:
If we do not put WHERE part of statement all data in the table will be deleted. Here is result of statement DELETE FROM Student

TRUNCATE TABLE
The TRUNCATE statement deletes all rows from the target table. Unlike the DELETE statement, it doesn’t have an optional condition, so it removes only all rows.
TRUNCATE TABLE “tableName“;
As an example, the following statement truncates the table Student.
TRUNCATE TABLE Student
After executing the statement, the table Student will be empty. In case of using the DELETE statement you can ROLLBACK it if you want, but you can't ROLLBACK the TRUNCATE TABLE statement.
When you need to delete all rows from a table, it is usually preferred to use TRUNCATE because it is significantly faster than DELETE.
DROPPING TABLE
When we want to remove not just data, but entire table from the database we use the DROP TABLE statement. Here is how the statement looks like:
DROP TABLE “tableName“
In our case it would be
DROP TABLE Student
The difference between DELETE and DROP statements seems small but it's big. DELETE statement removes all data from a table but leaves the table in the database along with all column and constraint definition. DROP statement removes table entirely from the database along with all columns, constraints and any link connecting it.